NEWS: Upgrade to Notes Story Board – the creative upgrade to Story Lite – with how to write ebooks bundle!
Story Lite, Notes Story Board, Story Turbo?
Basically, Story Lite is text only, Notes Story Board and Story Turbo also have image import and other extras.
Notes Story Board (and Story Turbo) extras are:
Grouping – use Ctrl key to add selections, and Ctrl/Drag to move.
Transparent text box backs – use right click to get to Text Box Formats.
Z level – in Formats – 0 is base, 1 is higher etc. Use this to layer boxes.
Snap to grid – line up boxes
Publish button on toolbar – for rtf (word processor), accurate web html export, images export, export to blog, social media etc.
Zoom 2% to 400% with shortcuts.
Many more improvements and shortcuts.
THREE KEY THINGS TO KNOW:
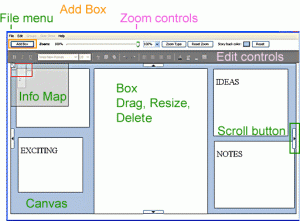
- Boxes can be dragged about on the large Canvas background, drag at the top of the box
- Move around the whole layout by clicking on the Canvas background (shows a Hand) and dragging
- Use the Info Map and the red box (top left) to see the whole canvas, move the red box to move on canvas
BOXES
- Each Box is an independent editing area. The editing controls are at the top of the screen – check these out.
- Boxes can be grouped with Ctrl click. Use Ctrl/mouse drag to move as a group.
- Colors can be changed in each Box, Text, Text Highlight, and Box background, and Box Border.
- Border colour for a Box – you have to set the Box Border Width in Preferences first. It is 0 by default.
- Boxes can be dragged about the Canvas (page) and resized, or deleted, or added (Add Box button on top).
INFO MAP
- This is the small map top left.
- It can be shown or hidden using the small icon.
- Drag the red box to reposition the view.
- Positions of Boxes are shown.
- Canvas layout is shown.
- Color changes to match background.
- It is more transparent when not in use.
CANVAS
- The Canvas is the whole background area, and also has a color change button on top right.
- It has a set size but it is dynamically changed if you drag or add a Box outside it. Actual Canvas size is shown in File menu / Statistics.
- The Application size is the View size, what you have on your screen. This can be smaller than the Canvas.
- Move the Canvas: use the click / drag action on the background area (not inside an editing Box).
- Or use the Scroll buttons (each side) which move you around, and add more Canvas if you get to the edge (again, dynamic so you can ignore what is going on).
- Right click on Canvas will show the Preferences. Check these out.
ZOOM
- Zoom slider is at top off screen. There are 2 types, Center Zoom and Left-Top Zoom. Try them out.
- 100% Zoom – there is a menu for preset zoom values (greater than 100% is coming in v1.1).
- Zoom box extents puts the whole layout into the view. This is useful if you have some stray Boxes off screen.
- Reset Zoom sets it to 100%, layout to top left of screen. A useful default setting.
FILE MENU
- Open file, or templates – templates are for different computer screen sizes.
- Save as… has export functions, you can save as Story format; Story template format; RTF (rich text format, for word processors, takes formatting); web (makes a web page).
- Export image saves a snapshot of what you see (not the whole layout if it is outside the view). If you need a bigger image, just move the Canvas around to get each part and put together in Photoshop or similar. This will be improved in v2
- Description allows you to add notes etc for the file.
- Preferences are on the File menu. The actual file is stored in:
[name-user-account]/Story Software/Story lite/
Most other things there are easy to understand so just play around. There is also a Help page on the About menu here.
Send us any interesting layouts or examples you create. We are having a Competition when we get going a bit. Good luck!
Also in this “How to Use’ navigation menu:
This section has articles on How to Write.
Use the navigation for some non-fiction uses for Story Lite in education, business and the web. Fiction examples are in the Genre writing menu.
Copyright exists in these example Story files. If you use them, please provide a link back to this web site, thanks.
You can use them as your ideas generator when you write your new story – novel, short story, whatever – in the central box.
Just play around and see what comes up.
This is not the same as staring at a blank piece of paper!
To add your own example file, just use the Contact form > and we will give you an email to send it to.
NEWS: Upgrade to Notes Story Board – the creative upgrade to Story Lite – with how to write ebooks bundle!

